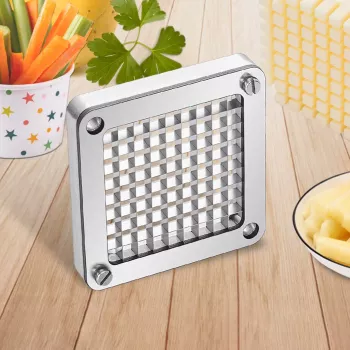
Swap Fry Cutter Blades: Stainless 1/4, 3/8, 1/2
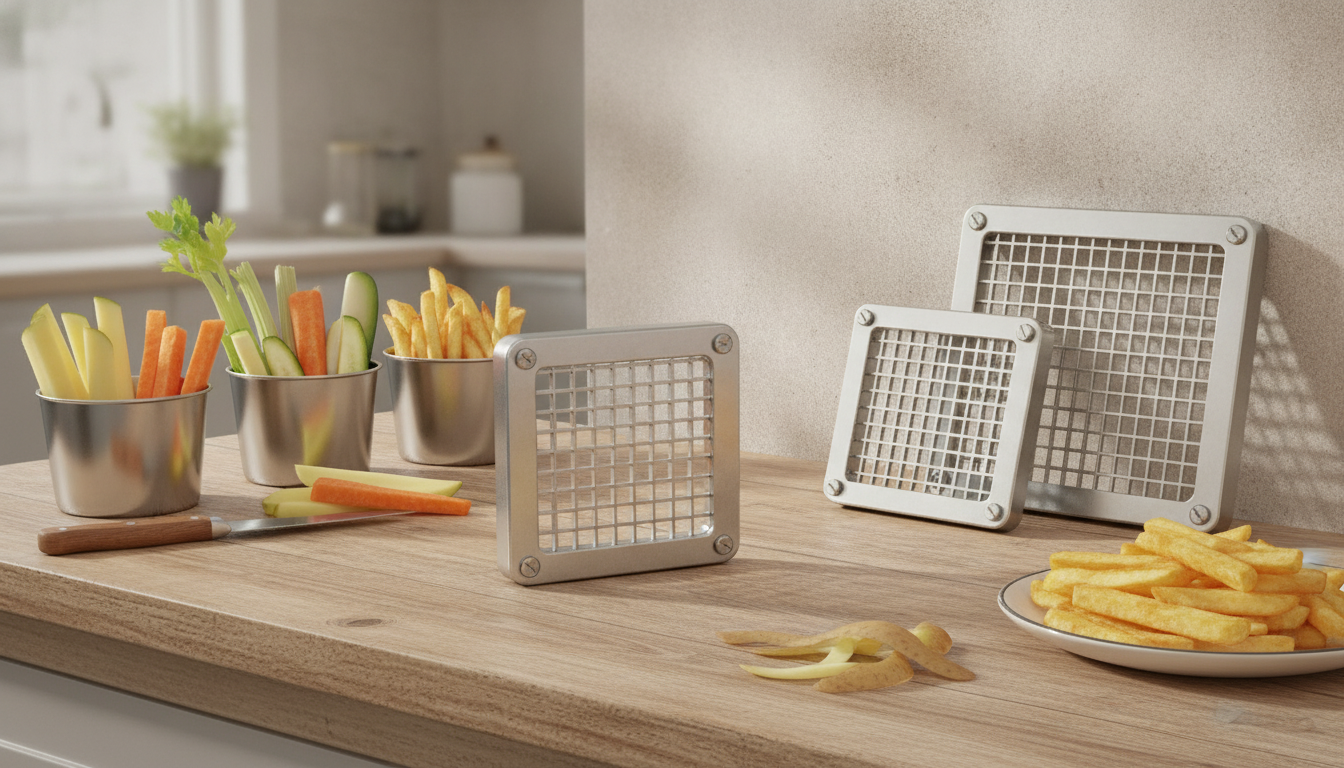
Stainless Steel Replacement Blades for French Fry Cutters (1/4, 3/8, 1/2 Inch): What to Know Before You Swap
Swapping dull cutter parts can restore clean, consistent fries without replacing the whole unit. A stainless steel replacement blade set is a practical way to bring back smooth push-through cuts, reduce potato splitting, and keep portion sizes consistent. Below is a clear breakdown of what typically comes in a 1/4, 3/8, and 1/2 inch set, how to confirm fit, and how to keep your new grid cutting cleanly for the long haul.
What a Replacement Blade Set Includes
Most multi-size replacement sets are built around the three fry widths that cover the majority of home and light commercial needs. The grid is the part that takes the most abuse—pressure, starch buildup, accidental twisting—so replacing it can make an older cutter feel new again.
- Three common cut sizes in one set: 1/4 inch (thin), 3/8 inch (medium), and 1/2 inch (thick).
- Stainless steel construction designed for repeated food contact and cleaning.
- Intended to replace worn, bent, or dulled grids so cuts remain straight and potatoes don’t split.
Choosing the Right Cut Size for Your Fries
Fry thickness changes more than looks—it affects cook time, texture, and how well fries hold toppings. If you rotate between air frying, deep frying, and oven baking, having more than one grid size can help you match the cut to the method.
| Blade size | Typical result | Best for | Cooking notes |
|---|---|---|---|
| 1/4 inch | Thin fries | Extra-crispy batches, quick snacks | Cooks quickly; watch for over-browning |
| 3/8 inch | Medium fries | All-purpose home frying/air frying | Good balance of crispness and tenderness |
| 1/2 inch | Thick fries | Steak fries, loaded fries | Needs longer time; consider par-cooking |
- 1/4 inch: Great when you want fast cooking and a snappy crunch. Thin cuts can break more easily if potatoes are very starchy, very cold, or if the grid is even slightly dull.
- 3/8 inch: The everyday “middle lane.” It’s thick enough to keep a fluffy interior, but still gets browned edges without a long cook.
- 1/2 inch: Best for steak-fries style and heavier toppings. Because the center takes longer to heat through, many cooks get the best results by par-cooking (brief blanching or a first fry) before finishing for color.
Fit and Compatibility Checks Before Buying
The most common mistake is assuming “1/4 inch” describes the whole part. It doesn’t. That measurement refers to the size of the fry openings, not the outer frame. Before ordering, do a quick fit audit so the new grid mounts securely and lines up with the pusher block.
- Confirm the cutter model and mounting style: Some grids attach with screws, others slide into a frame or clamp into a bracket. The correct mount style matters as much as the cut size.
- Measure outer dimensions: Check the grid’s width/height and (if applicable) screw-hole spacing. A few millimeters off can mean a loose grid that twists under pressure.
- Inspect the pusher block: If the pusher is worn or cracked, it may not press evenly across the grid. Uneven pressure is one of the fastest ways to bend blades—even brand-new ones.
- Match orientation: Make sure the blade grid sits the same direction as the original so the pusher’s pegs (or pattern) align with the openings.
Why Stainless Steel Matters for Replacement Blades
Stainless steel is a smart choice for a part that touches wet starch, salt, and cleaning chemicals. It isn’t “no maintenance,” but it tends to handle real kitchen life better than many plated options.
- Better rust and stain resistance: Especially when rinsed and dried promptly after washing.
- Cleaner cutting for longer: A more durable edge profile helps reduce crushing, wedging, and ragged ends.
- Handles normal washing: Hot water and common detergents are fine; prolonged soaking can still stress joints and edges.
- Simpler food-safe routine: Rinse, brush off starch, dry thoroughly, and store flat to avoid accidental dings.
For general food-equipment hygiene practices, it helps to follow established cleaning guidance such as the USDA’s “Clean” recommendations for kitchen sanitation (USDA FSIS). If you’re outfitting a higher-traffic kitchen, it’s also worth understanding equipment safety expectations and certification concepts (NSF).
Quick Swap Guide: Replacing the Grid Safely
Replacing a cutter grid is usually straightforward, but the sharp corners and tight tolerances can surprise people. A careful swap prevents stripped screws, twisted frames, and accidental cuts.
Keeping Blades Cutting Cleanly (and Avoiding Bent Grids)
When a Replacement Set Makes More Sense Than a New Cutter
Featured Items
- 3/8, 1/4, 1/2 Inch French Fry Cutter Replacement Blades – Stainless Steel Set
- Nordic Girl Diver Reading Figurine
FAQ
Will these 1/4, 3/8, and 1/2 inch blades fit any French fry cutter?
Not necessarily—those measurements describe fry thickness, not the grid’s outer frame size. Confirm your cutter’s model and mounting style, measure the grid’s outside dimensions and any screw-hole spacing, and make sure the pusher block aligns with the grid openings.
How do you clean a stainless steel fry cutter grid without dulling it?
Rinse right after cutting to prevent starch from hardening, then use a soft brush to clean corners without harsh abrasion. Dry thoroughly after washing and avoid long soaking; dishwasher use depends on your cutter’s design and whether other parts can trap moisture.
Why do fry cutter blades bend or leave potatoes stuck?
Common causes include forcing oversized potatoes, pushing too fast, dried starch buildup, a misaligned grid, or a worn pusher block that applies uneven pressure. Trim potatoes to fit, keep the grid clean, and stop if resistance suddenly increases to prevent twisting the blades.


Leave a comment